Using Overlayfs With Lxc
Overlay-filesystem (or Unionfs) is a filesystem service that uses union mount to mount different filesystems hierarchies to appear as one unified filesystem. The overlay-filesystem overlays one filesystem above the other into a layered representation.
When a directory appears in both layers, overlayfs forms a merged directory for both of them. In case of two files have the same name in both layers, only one is served from the upper or the lower layer, but if a file only exists in the lower layer and an edit needs to be done on that file, a copy of this file is created on the upper layer to be edited.
In most cases the lower layer is normally a read-only filesystem, while the upper layer is read-write one, to allow what is called copy on write, which allows only the writes to the upper filesystem leaving the base lower unchanged.
LXC and Overlayfs
Overlayfs can be used as a backing store for lxc, it can be used with lxc-create and lxc-clone commands.
Note that using overlayfs with -B option is supported since lxc 1.0. Now lets see how to use overlayfs with lxc.
lxc-create
This command used to create a new lxc container, choosing a different backing store other than the default simple directory (/var/lib/lxc/container-name/rootfs) is done using -B option, the valid backing stores are dir, lvm, btrfs, overlayfs, and zfs.
To create new container with overlayfs, you can simply write:
root@LXC-test:~#lxc-create --name lxctest --template ubuntu -B overlayfs
After the container is created, you can see that a new directory has been created within /var/lib/lxc/container-name/ with the name delta0 which represents the upper writable layer of the overlayfs.
root@LXC-test:~# ls /var/lib/lxc/lxctest/
 config delta0 fstab rootfs
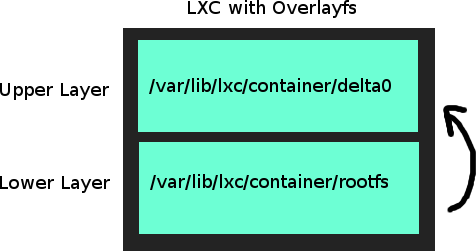
delta0 will store only the changes that has been made to the container, starting the container using lxc-start:
root@LXC-test:~# lxc-start -n lxctest
root@LXC-test:~# ls /var/lib/lxc/lxctest/delta0/
dev etc run var
By editing any file on the container, a copy of this file will be created on delta0 and then changes will applied on that copy.
root@LXC-test:~# lxc-info --name lxctest
 Name: lxctest
 State: RUNNING
 PID: 23626
 IP: 10.0.3.208
......
root@LXC-test:~# ssh [email protected]
ubuntu@lxctest:~$ sudo echo 'This file will be stored on delta0' > /home/ubuntu/test
ubuntu@lxctest:~$ exit

root@LXC-test:~# cat /var/lib/lxc/lxctest/delta0/home/ubuntu/test
This file will be stored on delta0
root@LXC-test:~# cat /var/lib/lxc/lxctest/rootfs/home/ubuntu/test
cat: /var/lib/lxc/lxctest/rootfs/home/ubuntu/test: No such file or directory
lxc-clone
Clones are two types: copy clone, and snapshot clone. The copy clone is simply a copy from the cloned container, a copy of the rootfs of the old container is created and assigned to the new container.
A snapshot clone will create a new container with the same rootfs of the old container, this new container will use the copy on write feature to store the changes made to a different place. We will use overlayfs to create a lxc clone from a “simple directory” container, note that you cant create a snapshot clone from a running container.
root@LXC-test:~# lxc-clone -o lxctest -n snapclone -B overlayfs -s
 lxc_container: lxccontainer.c: lxcapi_clone: 2733 error: Original container (lxctest) is running
 clone failed
root@LXC-test:~# lxc-stop --name lxctest
root@LXC-test:~# lxc-clone -o lxctest -n snapclone -B overlayfs -s
The configuration file will show that the rootfs of the new clone is the same as old container:
root@LXC-test:~# cat /var/lib/lxc/snapclone/config | grep lxc.rootfs
lxc.rootfs = overlayfs:/var/lib/lxc/lxctest/rootfs:/var/lib/lxc/snapclone/delta0
The snapshot clone is a great method to provision a new custom container for testing and development.