Kubernetes Installers (1): Kubespray
Kubernetes installation is considered a tough problem for any infrastructure operator, picking the right solution to deploy and run Kubernetes depends mainly on the user’s need, there is no one right solution for deploying Kubernetes however it depends on many variables including cloud provider, HA, network plugins, etc.
These series of posts will try to list some different popular approaches to install and run Kubernetes, and will try to compare different solutions and give a quick example on each installer, and I will start with kubespray which is one of popular approaches to install kubernetes.
Evaluating Installers
There are multiple factors that evaluate each Kubernetes installer, these factors include but not limited to:
- One click deployment.
- Cloud providers support.
- Automatic provisioning.
- High available installation (multiple masters/multiple Etcd).
- Multiple Network plugins support (Calico, Flannel, etc.).
- Cross platform support.
- Support for bare metal installation.
- Scaling support.
- Upgrades support.
- Rolling back support.
Kubernetes Components
Kubernetes installation consists of many different components, the following diagram will try to show an example of kubernetes installation components, note that this is not the only way to distribute or deploy the k8s components:
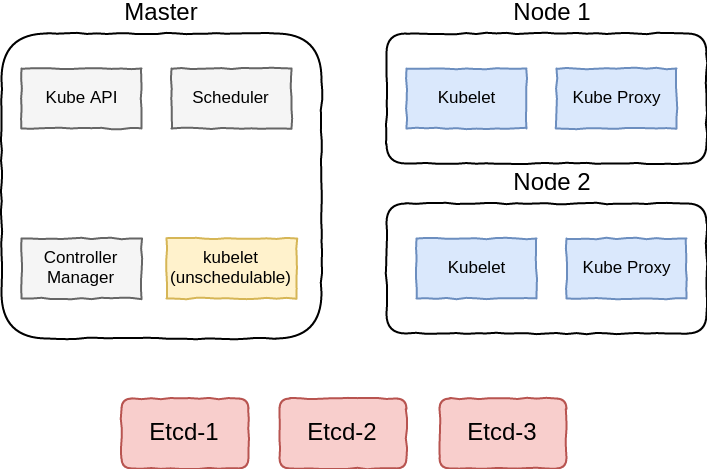
These components are deployed in different methods, in kubeadm and kubespray kubelet is deployed as a system service, and the other components will be deployed as static pods in kubernetes and managed by kubelet, kubelet however can also be deployed as a docker container.
Kubespray
Kubespray is a popular choice to deploy and run Kubernetes, it uses Ansible to provision and orchestrate components on different cloud providers and bare metal hosts, Kubespray is not tightly coupled with any particular cloud provider, it does a generic configuration management tasks for kubernetes clustering and control plane bootstraping.
In addition kubespray support most of Linux distributions and considered a composable solution where user can mix and match different components including the network plugin choice, kubelet installation method, certificate and token management using vault, etc.
Kubespray Playbook Hierarchy
When you pull the kubespray repo you will notice the following YAML files at the top of the repository:
➜ tree -L 1 kubespray/
...
├── cluster.yml
├── reset.yml
├── scale.yml
├── upgrade-cluster.yml
...
9 directories, 24 files
The cluster.yml file is the playbook responsible for deploying the cluster and all of its components, reset.yml will delete all the components deployed on the cluster, scale.yml will add more workers nodes according to the inventory file, and finally the upgrade-cluster.yml will upgrade the Kubernetes version to higher version.
Ansible depends on the inventory to reach and run against multiple platforms at the same time, if you are not familiar with Ansible inventory, you may want to take a quick look at the Ansible official documentation for more information before going further in the post.
Kubespray inventory must be created before running the Ansible playbook, there are 3 main groups that should be defined in the inventory:
- kube-master: The master nodes.
- kube-node: The worker nodes.
- etcd: The etcd nodes
It is not recommended to put a node in multiple groups in production environments, also its recommended to have at least 3 etcd nodes in order to have a highly available cluster, there are also 2 more groups that can be defined according to kubespray official docs.
The variables can be defined according to the inventory groups, to apply variables to all groups, you can specify the variables in inventory/group_vars/all.yml, for a list of all variables please refer to the kubespray docs.
Cloud Providers
Kubespray is one of the few installers that supports installation of kubernetes on multiple cloud providers, the tool officially supports:
| Cloud Provider | Automatic Provisioning | Documentation |
|---|---|---|
| AWS | Yes | link |
| Azure | Yes | link |
| Openstack | Yes | link |
| Vsphere | No | link |
| GCE | Yes | - |
User can use the cloud provider’s feature to deploy kubernetes resources, for example when using AWS as cloud provider, any Load balancer service in kubernetes will be mapped to an ELB in AWS.
Operating systems
There are some notes for different operating systems that needs to be considered before running kubespray:
- Debian (Jessie): dbus package should be install prior to running the Ansible playbook.
- Ubuntu (Xenial): Ubuntu 16.04 usually image on most providers doesn’t ship with python package installed, which is need for Ansible to run properly.
There more notes that should be considered for CoreOS and Debian which are mentioned in the official documentation.
Example on AWS
Let’s run a quick example on AWS to check kubespray in action!. I specifically chose AWS because i am going to compare running the different installers on this cloud provider and compare the results in future posts.
In this example i will not use automatic provisioning to deploy the machines, however the machines will be created beforehand.
Provision servers
In this example I am going to use 4 servers, 1 master and 3 worker nodes, we will choose to install etcd on the master node, I am going to use Ubuntu 16.04 for this example, when creating the servers you need to assign them the correct IAM roles so that the nodes can communicate properly with AWS API, the correct IAM policies for the master and minion nodes can be found here.
One more note when creating the instances, you need to tag the instances with the following tag:
kuberentes.io/cluster/$cluster_name
$cluster_name should be a unique value, you need also to tag the subnets in your VPC with the same tag accordingly for the aws provider to utilize them, there is one more tag for the subnets that are targeted by external or internal ELBs:
kubernetes.io/role/elb
kubernetes.io/role/internal-elb
Creating Inventory
The next step is to create the inventory, the inventory should look something like that:
inventory/ansible.cfg
# ## Configure 'ip' variable to bind kubernetes services on a
# ## different ip than the default iface
ip-10-0-0-90.eu-central-1.compute.internal ansible_ssh_host=18.194.248.158
ip-10-0-0-53.eu-central-1.compute.internal ansible_ssh_host=35.156.176.167
ip-10-0-0-9.eu-central-1.compute.internal ansible_ssh_host=18.194.131.98
ip-10-0-0-163.eu-central-1.compute.internal ansible_ssh_host=52.29.35.99

[kube-master]
ip-10-0-0-90.eu-central-1.compute.internal

[etcd]
ip-10-0-0-90.eu-central-1.compute.internal

[kube-node]
ip-10-0-0-53.eu-central-1.compute.internal
ip-10-0-0-9.eu-central-1.compute.internal
ip-10-0-0-163.eu-central-1.compute.internal

[k8s-cluster:children]
kube-node
kube-master
Note that we used ip-x-x-x-x.eu-central-1.compute.internal as a node name, this is a requirement when using AWS cloud provider in kubespray.
Configuring variables
The last step before running the playbook is to configure the playbook variable, first uncomment cloud_provider in inventory/group_vars/all.yml and set it to aws.
Running The playbook
Use the following command to kick off a kubespray installation:
ansible-playbook --flush-cache -u ubuntu -i inventory/inventory.cfg -b -v cluster.yml
....
PLAY RECAP ************************************************************************************************************************************************
ip-10-0-0-215.eu-central-1.compute.internal : ok=258  changed=68   unreachable=0    failed=0
ip-10-0-0-235.eu-central-1.compute.internal : ok=354  changed=108  unreachable=0    failed=0
ip-10-0-0-29.eu-central-1.compute.internal : ok=259  changed=68   unreachable=0    failed=0
ip-10-0-0-95.eu-central-1.compute.internal : ok=317  changed=79   unreachable=0    failed=0
localhost                  : ok=3    changed=0    unreachable=0    failed=0
On master you can find the kubectl config in /root/.kube/config or in /etc/kubernetes/admin.conf, you can test the cluster to make sure everything is working properly:
kubectl get nodes
NAME                                          STATUS    AGE       VERSION
ip-10-0-0-215.eu-central-1.compute.internal   Ready     12m       v1.7.5+coreos.0
ip-10-0-0-235.eu-central-1.compute.internal   Ready     12m       v1.7.5+coreos.0
ip-10-0-0-29.eu-central-1.compute.internal    Ready     12m       v1.7.5+coreos.0
ip-10-0-0-95.eu-central-1.compute.internal    Ready     12m       v1.7.5+coreos.0
As you can see all 4 nodes are up and running.
root@ip-10-0-0-235:~# kubectl get pods --all-namespaces
NAMESPACE     NAME                                                                  READY     STATUS    RESTARTS   AGE
kube-system   calico-node-3jwp3                                                     1/1       Running   0          8m
kube-system   calico-node-g21rp                                                     1/1       Running   0          8m
kube-system   calico-node-nn6xv                                                     1/1       Running   0          8m
kube-system   calico-node-znf59                                                     1/1       Running   0          8m
kube-system   kube-apiserver-ip-10-0-0-235.eu-central-1.compute.internal            1/1       Running   0          12m
kube-system   kube-controller-manager-ip-10-0-0-235.eu-central-1.compute.internal   1/1       Running   0          12m
kube-system   kube-dns-3888408129-fxv3c                                             3/3       Running   0          7m
kube-system   kube-dns-3888408129-gjv93                                             3/3       Running   0          7m
kube-system   kube-proxy-ip-10-0-0-215.eu-central-1.compute.internal                1/1       Running   0          13m
kube-system   kube-proxy-ip-10-0-0-235.eu-central-1.compute.internal                1/1       Running   0          13m
kube-system   kube-proxy-ip-10-0-0-29.eu-central-1.compute.internal                 1/1       Running   0          13m
kube-system   kube-proxy-ip-10-0-0-95.eu-central-1.compute.internal                 1/1       Running   0          12m
kube-system   kube-scheduler-ip-10-0-0-235.eu-central-1.compute.internal            1/1       Running   0          13m
kube-system   kubedns-autoscaler-1629318612-sbpvd                                   1/1       Running   0          7m
kube-system   kubernetes-dashboard-3941213843-695nk                                 1/1       Running   0          7m
kube-system   nginx-proxy-ip-10-0-0-215.eu-central-1.compute.internal               1/1       Running   0          13m
kube-system   nginx-proxy-ip-10-0-0-29.eu-central-1.compute.internal                1/1       Running   0          13m
kube-system   nginx-proxy-ip-10-0-0-95.eu-central-1.compute.internal                1/1       Running   0          13m
Now let’s test Load balancer service in the AWS cloud provdier, run the following manifest:
apiVersion: v1
kind: ReplicationController
metadata:
  name: nginx
spec:
  replicas: 5
  selector:
    name: nginx
  template:
    metadata:
      labels:
        name: nginx
    spec:
      containers:
        - name: nginx
          image: nginx
          ports:
            - containerPort: 80

---

apiVersion: v1
kind: Service
metadata:
  name: lbnginx
  labels:
    name: lbnginx
spec:
  type: LoadBalancer
  ports:
  - port: 8888
    targetPort: 80
  selector:
    name: nginx
After running these resources, you can query the api to check if the Load balancer were created correctly:
kubectl describe services lbnginx
Name:			lbnginx
Namespace:		default
Labels:			name=lbnginx
Annotations:		<none>
Selector:		name=nginx
Type:			LoadBalancer
IP:			10.233.8.204
LoadBalancer Ingress:	a97eb9eeeb7bb11e7b152025e431e7a6-273203114.eu-central-1.elb.amazonaws.com
Port:			<unset>	8888/TCP
NodePort:		<unset>	30260/TCP
Endpoints:		10.233.125.196:80,10.233.125.197:80,10.233.125.198:80 + 2 more...
Session Affinity:	None
Events:
  FirstSeen	LastSeen	Count	From			SubObjectPath	Type		Reason			Message
  ---------	--------	-----	----			-------------	--------	------			-------
  30s		30s		1	service-controller			Normal		CreatingLoadBalancer	Creating load balancer
  28s		28s		1	service-controller			Normal		CreatedLoadBalancer	Created load balancer
As you can see all resoruces were created successfully.
Wrapping It Up
Kubespray is definitely an obvious choice for you if you want a configurable solution with many options and easy to understand modify to your needs, so here is the evaluation of this comprehensive Ansible playbook according to the variables we specified earlier:
| Feature | Support |
|---|---|
| One click deployment | x |
| Cloud providers support | ✔ |
| Automatic provisioning. | ✔ |
| High available installation (multiple masters/multiple Etcd). | ✔ |
| Multiple Network plugins choices (Calico, Flannel, etc.). | ✔ |
| Cross platform support | ✔ |
| Support for bare metal installation | ✔ |
| Scaling support | ✔ |
| Upgrades support | ✔ |
| Rolling back support | x |
Kubespray however didn’t do so good timing wise, running the playbook on a 4 node installation took roughly about ~10 minutes which doesn’t including provisioning time, in the next posts i will try to evaluate more tools including kops, kubicorn, etc.